
This sourdough panettone is incredibly airy and light, with a perfect balance of sweetness from the dough and slight bitterness from the chocolate chips.
The hint of orange zest adds a delightful aroma. Despite being a sourdough, this panettone isn’t sour, thanks to frequent starter feedings. It’s a great treat for the Christmas and New Year season.
Original Inspiration
This recipe is adapted from Matteo’s recipe at Ca Mia Breadlab, with some alterations like switching candied fruits for chocolate and adjusting quantities.
or more amazing sourdough recipes, check out Matteo’s blog and Maurizio’s blog, The Perfect Loaf, where I learned to make my starter.
Tips
- Little Molds: Use small molds for leftover dough. These make great gifts!
- Variations: You can make half with chocolate and half with traditional raisins and candied fruits by dividing the dough before adding mix-ins.
- Molds and Skewers: I use 5.25-inch and 2.75-inch round panettone molds from Sur La Table and 16-inch non-stick barbecue skewers from Crate & Barrel for cooling.

Sourdough Panettone with Chocolate Chips
This sourdough panettone is wonderfully light and airy, offering a perfect blend of sweetness from the dough and a slight bitterness from semi-sweet chocolate chips. The addition of orange zest adds a delightful aroma, making it an ideal holiday treat for Christmas or New Year. Despite using sourdough, this recipe doesn’t carry a tangy flavor, thanks to the frequent feedings of the starter. Serve it as a festive dessert or gift smaller versions to friends and family.
Equipment
- 1 Stand mixer with paddle and dough hook attachments
- 1 Digital scale for accurate measurements
- 1 Mixing bowls
- 1 Plastic Wrap
- 1 Panettone molds (5.25-inch round or smaller)
- 1 Metal skewers (for cooling)
- 1 Oven and baking sheets
- 1 Cooling rack or boxes for hanging
Ingredients
Starter Feedings
- 33 g sourdough starter (for each feeding)
- 33 g bread flour (for each feeding)
- 15 g water (for each feeding)
First Dough
- 290 g bread flour
- 82 g egg 80g fed sourdough starter (about 5 large yolks, room temperature)
- 82 g sugar
- 88 g unsalted butter softened
- 145 g water
- 80 g fed sourdough starter
Second Dough
- 88 g 88g bread flour
- 88 g egg yolks about 5-6 large yolks, room temperature)
- 88 g sugar
- 4.7 g salt
- 250 g chocolate chips semi-sweet
Aromatic Butter
- 175 g unsalted butter softened
- 20 g honey
- 1 small Zest of orange (or half of a large one)
- 1 small Zest of lemon (or half of a large one)
Instructions
Day 1: Starter Feedings
- Feed your starter three times: once at 8:30 am, then at 1:00 pm, and again at 5:00 pm. Keep it at a warm temperature, between 80-83°F (27-28°C). By 9:00 pm, your starter should be active and ready for the first dough.

- Day 1: First Dough (9:00 pm)In a stand mixer, combine water, sugar, yolks, sourdough starter, and bread flour (but not the butter). Mix on speed 2, then gradually increase to speed 4.

- Lower to speed 2 and add softened butter one chunk at a time. Knead the dough for about 15 minutes on medium speed.

- Perform a Window Pane Test to check gluten development. If it passes, the dough is ready.

- Butter your work surface and form the dough into a ball. Place it in a buttered bowl, cover with plastic wrap, and let it ferment overnight in a warm spot (around 80°F) until it triples in size.

Day 2: Aromatic Butter (9:30 am)
- Combine softened butter, honey, and the orange and lemon zests in a bowl. Set aside.

Day 2: Second Dough (10:00 am)
- Once the first dough has tripled in size, refrigerate it for 30 minutes. Measure out flour and salt in one bowl, and whisk together the egg yolks and sugar in another. Strain the yolks to avoid an eggy smell.
- In your stand mixer, add the chilled dough, then gradually add the flour and salt on low speed. Switch to the dough hook once mixed. Slowly pour in the yolk-sugar mixture and knead for about 15 minutes on speed 4 (or speed 2 if it becomes too heavy).

- Perform the Window Pane Test again. Then, gradually add in the aromatic butter and knead until the dough is smooth and elastic.

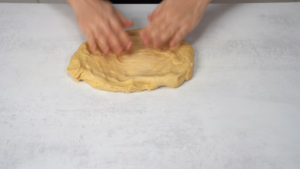
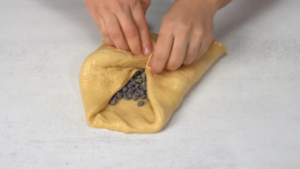
- Spread the dough on a buttered surface, press in the chocolate chips, and fold the dough to incorporate them evenly. Form the dough into a ball, place it in a buttered bowl, cover, and let it rest for 30 minutes. Fold the dough a few more times, then shape it back into a ball. Let the dough rise in a turned-off oven for 3.5-4.5 hours, or until it has doubled in size.
Day 2: Shaping the Dough (3:00 pm)
- Once your dough has risen, cool the oven by turning it off 30 minutes before shaping. Divide the dough into portions (480g for 5.25-inch molds), and shape each portion into a ball.

- Place the shaped dough into the panettone molds, filling them about 1/3 to 1/2 of the way. Allow the dough to proof for about 5 hours, or until it has risen near the top of the molds.

Day 2: Scoring, Topping, and Baking (9:00 pm)
- Preheat the oven to 340°F (170°C).

- Score a cross on the top of each panettone and place a small chunk of butter in the center. Sprinkle with pearl sugar if desired. Place the molds on double-stacked baking sheets and bake for 40-50 minutes (reduce to 25-35 minutes for smaller molds).

Day 2: Cooling (9:50 pm)
- Once baked, prepare your cooling setup by placing two boxes and inserting metal skewers through the base of each panettone. Hang the panettone upside down between the boxes to cool for at least 4 hours, or overnight, to prevent collapse.
