
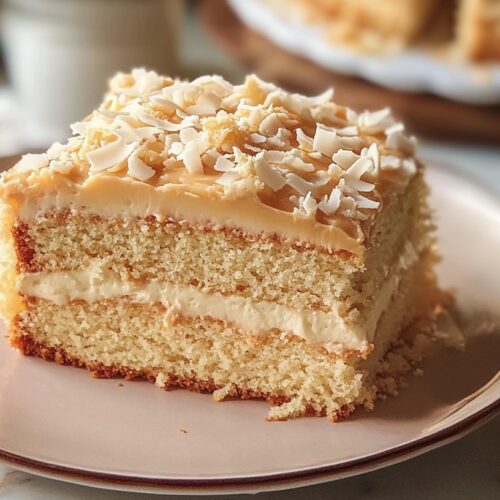
If you’re looking for a dessert that’s as indulgent as it is beautiful, this coconut cake with dulce de leche frosting is the perfect choice.Picture soft, moist layers of coconut-infused cake paired with a rich, buttery dulce de leche frosting that melts in your mouth.
This recipe brings together the best of tropical flavors and caramel sweetness to create a show-stopping dessert that’s surprisingly easy to make.
Whether you’re a seasoned baker or a beginner, this guide will walk you through every step to ensure a flawless cake that will wow your family and friends. Let’s get baking!
Recipe for Coconut Cake with Dulce de Leche Frosting
Equipment
- Mixing bowls (large and medium)
- Electric mixer or whisk
- Measuring cups and spoons
- 2 Round 9-inch cake pans
- Parchment paper
- Spatula
- Wire cooling rack
- Offset spatula or butter knife (for frosting)
- Toothpick or skewer (for testing doneness)
Ingredients
For the Cake:
- 2½ Cups All-purpose flour
- 2 Tsp Baking powder
- ⅓ Tsp Baking soda
- ½ Tsp Salt
- ¾ Cup Unsalted butter (softened)
- 1¾ Cups Granulated sugar
- 4 Large eggs
- 1 Cup Canned coconut milk (shake well before using)
- 1 Tsp Tsp vanilla extract
- 1 Tsp Coconut extract (optional, for extra coconut flavor)
- 1 Cup Shredded sweetened coconut
For the Dulce de Leche Frosting:
- 1 Cup Unsalted butter (softened)
- 1 Cup Dulce de leche (store-bought or homemade)
- 2 Cups Powdered sugar (sifted)
- 1 Tsp Vanilla extract
- Pinch of salt
Optional Garnish:
- Toasted shredded coconut
- A drizzle of dulce de leche
Instructions
- Prep the Oven and PansPreheat your oven to 350°F (175°C).Grease the cake pans and line the bottoms with parchment paper.

- Make the Cake BatterIn a medium bowl, whisk together the flour, baking powder, baking soda, and salt. Set aside.In a large bowl, cream the softened butter and sugar until light and fluffy (about 3 minutes) using an electric mixer.Add eggs one at a time, beating well after each addition. Stir in the vanilla and coconut extract.Gradually mix in the dry ingredients, alternating with coconut milk, starting and ending with the dry mixture. Mix just until combined—don’t overmix.Gently fold in the shredded sweetened coconut.

- Bake the CakesDivide the batter evenly between the prepared pans.Bake for 35-40 minutes, or until a toothpick inserted into the center comes out clean.Let the cakes cool in the pans for 10 minutes, then turn them out onto a wire rack to cool completely.

- Make the FrostingIn a large bowl, beat the butter until creamy.Add dulce de leche and mix until smooth and fluffy.Gradually add the powdered sugar, beating on low speed until combined.Stir in the vanilla and a pinch of salt. If the frosting is too thick, add a tablespoon of milk at a time until it reaches your desired consistency.

- Assemble the CakePlace one cake layer on a serving plate and spread a generous layer of frosting on top.Add the second cake layer and frost the top and sides of the cake evenly.Garnish with toasted shredded coconut and a drizzle of dulce de leche if desired.

- Serve and Enjoy!Slice and serve the cake at room temperature. It pairs wonderfully with coffee or tea.

Video
Notes
- For a richer coconut flavor, use coconut cream instead of coconut milk.
- To toast coconut, spread it on a baking sheet and bake at 350°F (175°C) for 5-7 minutes, stirring occasionally.
- If you prefer a thinner frosting, warm the dulce de leche slightly before mixing.
How to Make Homemade Dulce de Leche?

There’s something magical about making dulce de leche at home—it’s simple, satisfying, and fills your kitchen with the sweetest caramel aroma.
If you’ve never tried it before, don’t worry! With just a can of sweetened condensed milk and a little patience, you can create a silky, golden treat that’s perfect for this cake (and so much more).
Here’s how I do it
Stovetop Method (My Go-To)
- Remove the label from a can of sweetened condensed milk.
- Place the unopened can in a large pot and fill it with water until the can is fully submerged.
- Bring the water to a gentle simmer and let the can cook for 2-3 hours. The longer it simmers, the darker and thicker the dulce de leche will be.
- Keep checking to make sure the can stays submerged, adding water as needed.
- Carefully remove the can (use tongs!) and let it cool completely before opening.
Oven Method (Great for Larger Batches)
- Pour the sweetened condensed milk into a baking dish and cover it tightly with foil.
- Place the dish in a larger roasting pan and fill the pan with hot water until it reaches halfway up the sides of the dish.
- Bake at 350°F (175°C) for about 1 ½ hours, stirring every 30 minutes, until you get that luscious caramel color.
Pressure Cooker Method (For the Brave and Impatient)
If you’re short on time, you can use a pressure cooker to make dulce de leche in about 40 minutes. Just be sure to follow your pressure cooker’s safety instructions!
Perfect Pairings
This coconut cake with dulce de leche frosting is a show-stopper on its own, but if you want to create an unforgettable dessert spread, here are some pairing ideas that I absolutely love:
- Coffee or Espresso: The bold, slightly bitter flavors of coffee balance the sweetness of the cake and frosting perfectly. A cappuccino or latte with a sprinkle of cinnamon would be divine.
- Fresh Tropical Fruits: Serve slices of mango, pineapple, or passion fruit on the side for a refreshing contrast to the rich cake.
- Coconut Ice Cream: Double down on the tropical vibes with a scoop of creamy coconut ice cream—or vanilla if you prefer something more classic.
- A Glass of Milk or Coconut Milk: Sometimes, you just need a simple glass of milk to wash down the sweet, rich flavors of this cake.
- Dessert Cocktails: A piña colada, a coconut rum punch, or even a creamy white Russian can turn this cake into a star of any celebration.
Final Thoughts
Coconut cake with dulce de leche frosting offers an incredible combination of textures and flavors, making it a dessert that’s worth the effort. The balance of the moist, coconut-infused layers and the rich, caramel sweetness of the frosting creates a truly standout dish. Whether you’re preparing it for a birthday, a dinner party, or just because, it’s a recipe that delivers every time.
Experimenting with this cake can lead to some fun discoveries—adding fruit, trying alternative garnishes, or adjusting the sweetness to suit your taste. Over the years, it’s become a staple in my recipe collection, and I hope it earns the same place in yours.
If you make it, don’t keep it to yourself. Share your thoughts, tweaks, or even a picture of your masterpiece. Nothing beats connecting over great food, and I’d love to hear how this cake turned out in your kitchen.
Next Recipe to Check – Chocolate Raspberry Cake for Any Occasion